The Brady Android SDK Demo
Android Prerequisites
- Must set minSdkVersion in build.gradle to 26 or above.
- Add the Brady SDK dependency to your app-level build.gradle in Android Studio.
implementation 'com.bradyid:BradySdk:3.2.2'
- Add the following to your application's build.gradle file:
android {
    packaging {
        resources {
            // This is the only fix to remove duplicate transitive dependencies
            // (you may already have this if your app uses other third-party libraries.
            excludes += "/META-INF/DEPENDENCIES"
        }
    }
}
- If you are not using Android Studio, find alternative methods here: https://central.sonatype.com/artifact/com.bradyid/BradySdk
- Within the "Snippets" box on the "Overview" page, you may select the dropdown menu to see other supported dependencies.
- It is also suggested to use the most updated version of the SDK. Ensure that your version is the most recent version using the same link above.
Versions >=1.7.0
Custom Brady fonts are no longer embedded in the Android SDK. Therefore, they must be downloaded here.
The custom Brady fonts only need to be downloaded and embedded into your application if the BWT files being used by your application were designed with any of these fonts. To embed them in your Android application:
- Create a Resource Folder called "fonts" in your application's "res" directory.
- Drag and drop the desired fonts into the new Resource Folder.
- After initializing a Template object in your code, add the following:
int[] fontList = new int[]{R.font.brady_fixed_width, R.font.brady_fixed_width_bold, R.font.brady_alpine, R.font.brady_alpine_bold};
template.storeFonts(this, fontList);
Printer Discovery
Before starting this tutorial, it is important to note that the SDK was not designed to discover, connect, print, and disconnect all at once. The printer itself will still struggle to receive and send data this quickly.
Example: It is not recommended to design an app with a single button labeled "Print" where the app would discover, connect, print, and then disconnect on the button click.
Requesting Permissions
In order to discover nearby printers, the user must approve the required permissions:
if (ContextCompat.checkSelfPermission(this, Manifest.permission.BLUETOOTH_CONNECT) != PackageManager.PERMISSION_GRANTED ||
    ContextCompat.checkSelfPermission(this, Manifest.permission.BLUETOOTH_SCAN) != PackageManager.PERMISSION_GRANTED ||
    ContextCompat.checkSelfPermission(this, Manifest.permission.ACCESS_FINE_LOCATION) != PackageManager.PERMISSION_GRANTED ||
    ContextCompat.checkSelfPermission(this, Manifest.permission.BLUETOOTH) != PackageManager.PERMISSION_GRANTED) {
    //Build.VERSION_CODES.S is SDK Version 31. When version 31 was released, the required bluetooth permissions changed.
    if (Build.VERSION.SDK_INT >= Build.VERSION_CODES.S) {
        ActivityCompat.requestPermissions(this, new String[]{Manifest.permission.BLUETOOTH_CONNECT, Manifest.permission.BLUETOOTH_SCAN,
                Manifest.permission.ACCESS_FINE_LOCATION, Manifest.permission.BLUETOOTH}, 0);
    }
    else{
        ActivityCompat.requestPermissions(this, new String[]{Manifest.permission.ACCESS_COARSE_LOCATION, Manifest.permission.ACCESS_FINE_LOCATION, Manifest.permission.BLUETOOTH}, 0);
    }
}
- This should prompt the user only on the initial opening of the application.
- If the user does not allow permissions when prompted, they can always go into the settings app to allow them later. However, the user will never be able to discover printers without approving these permissions.
Implementing Discovery
- Create a new PrinterDiscoveryImpl which takes the app context:
List<PrinterDiscoveryListener> printerDiscoveryListeners = new ArrayList<>();
printerDiscoveryListeners.add(this);
PrinterDiscovery printerDiscovery = PrinterDiscoveryFactory.getPrinterDiscovery(context.getApplicationContext(), printerDiscoveryListeners);
-
Start discovering nearby printers:
- To start discovering devices compatible with Wi-Fi, call:
printerDiscovery.startWifiPrinterDiscovery();
- To start discovering Bluetooth Classic devices, call:
printerDiscovery.startBluetoothPrinterDiscovery(false);- If the parameter is set to true, it will only discover printers already paired to the mobile device.
- If the parameter is set to false, it will return printers paired to the mobile device AND search nearby for other printers. (If a printer is both already paired and turned on nearby, it will be found twice).
- To start discovering Bluetooth Low Energy devices, call:
printerDiscovery.startBlePrinterDiscovery()
- To start discovering devices compatible with Wi-Fi, call:
-
To stop all discovery processes:
printerDiscovery.stopPrinterDiscovery()
IMPORTANT NOTE
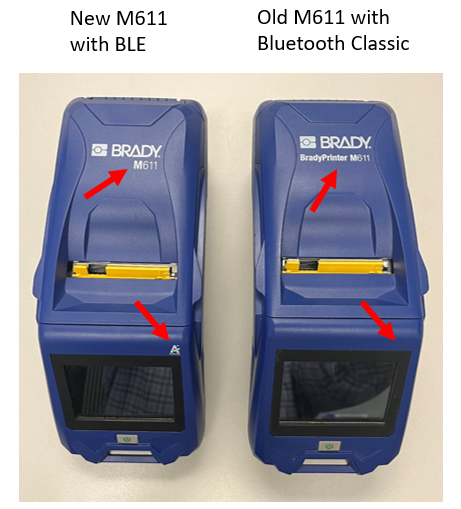
If customers are using an M611 Latimer, do not call "printerDiscovery.startBluetoothPrinterDiscovery()". This is because the M611 firmware has a bug where it can be discovered as a Bluetooth Classic device even though it only supports a Bluetooth Low Energy connection. M611's bought after March 2023 are most likely M611 Latimer's. This can be tested by downloading the Brady Express Labels application and attempting to connect to it via Bluetooth Low Energy or the following graphic may help you identify this discrepancy:
Implementing PrinterDiscoveryListener
In order to "catch" discovered printers, implement the SDK's PrinterDiscoveryListener in your UI's class header.
public class MainActivity implements PrinterDiscoveryListener {
Implementing this interface will force you to add its respective methods which are as follows:
- printerDiscovered (triggers when a printer is found and gives you the object).
- printerDiscoveryStarted (triggers when discovery scan starts).
- printerDiscoveryStopped (triggers when discovery scan stops).
Printer Connection
Connecting to a Printer
- The connectToDiscoveredPrinter() method uses the intialized PrinterDiscovery and attemps to connect to the desired printer and returns a PrinterDetails object.
printerDiscovery.connectToDiscoveredPrinter(Context context, DiscoveredPrinterInformation printerSelected, List<PrinterUpdateListener> pul)
contextis the UI context of the activityprinterSelectedis the DiscoveredPrinterInformation object of the printer to connect to.pulis a list of listener objects. (This works similar to a "Context" object because it can be initialized as "MainActivity.this".)
It is recommended to call the connectToDiscoveredPrinter method inside another thread, so that it can run asynchronously and we can wait for it to finish by initializing a loading wheel or another similar view.
Runnable r = () -> {
    printerDetails = printerDiscovery.connectToDiscoveredPrinter(context, printerSelected, Collections.singletonList(MainActivity.this));
};
Thread connectThread = new Thread(r);
connectThread.start();
After the connection has successfully finished, it will return a PrinterDetails object populated with details about the printer, such as name and model number, battery life, and installed part/supply information.
- To show a progress bar and then hide it upon completing a successful connection, see the code below:
public void connectToPrinter(String printerSelected, PrinterUpdateListener pul, boolean showDetailPage) {
    Runnable r = () -> {
        runOnUiThread(()->progressBar.setVisibility(View.VISIBLE));
        printerDetails = printerDiscovery.connectToDiscoveredPrinter(context, printerSelected, Collections.singletonList(pul));
        runOnUiThread(()->progressBar.setVisibility(View.INVISIBLE));
    };
    Thread connectThread = new Thread(r);
    connectThread.start();
}
Automatic Connection
Once your application has connected to a printer for the first time, it will store the printer object internally. You can add a feature to your app that grabs this object and connects to it automatically without having the user manually select a printer from the UI:
//Use this PrinterDiscovery method to find the name of the printer available to automatically connect to.
String lastConnectedPrinter = printerDiscovery.getLastConnectedPrinterName();
//Now, whenever a printer is discovered, it'll compare it immediately to this printer name.
//If it matches, it'll attempt to connect right away when the app starts.
if (foundPrinterName == lastConnectedPrinter) {
    printerDetails = printerDiscovery.connectToDiscoveredPrinter(context, printerSelected, Collections.singletonList(pul));
}
Calling printerDetails.disconnect() will make the app "forget" about this printer internally and will not connect automatically afterwards until another printer is connected.
OWNERSHIP NOTE: Using an M211 introduces the concept of "ownership". When connecting to an M211 with a mobile device for the first time, the blue light on the M211 should be blinking. If the light is solid blue, another mobile device "owns" the printer and only that device will be able to connect. In the event that a connection fails, a device can still have "ownership". Therefore, being connected and having ownership are not synonymous. To connect using a different mobile device, hold the power button for five seconds to release ownership.
Disconnecting from a Printer
- Simply call
try await printerDetails.disconnect() - After disconnecting, it is recommended to start discovering for printers again.
Performing Other Printer Operations
-
Feed a label:
printerDetails.feedSupply()
-
Cut a label:
printerDetails.cutSupply()
-
Set the printer's automatic shutoff timer:
printerDetails.setAutomaticShutoffTime(int timeInMinutes)
Connect/Disconnect Permutations
Scenario #1: If you connect for the first time and the printer disconnects unexpectedly (turned off, taken out of range, etc.), the printer will send a "CurrentStatus" update to the PrinterUpdate override method.
- Because of this scenario, you must have a way to notify your UI view that the printer is no longer connected.
@Override
public void PrinterUpdate(List<PrinterProperties> list) {
    for(PrinterProperties property : list) {
        if(property == PrinterProperties.CurrentStatus) {
            if(printerDetails.getPrinterStatusMessage().equals("PrinterStatus_Disconnected")) {
            //ENTER CODE HERE TO HANDLE THE DISCONNECT (start discovery again or disable the print button for example)
            }
        }
    }
}
Scenario #2: You must only use the reconnect() if you have previously connected once (since the app has been open). If you connect for the first time, close the app, open the app, and call reconnect(), it will not work because the PrinterDetails will once again be null.
- Because of this scenario, you must only use the reconnect() method if the printer has disconnected for an unknown reason and you are attempting to reconnect.
if (printerDetails != null) {
    printerDiscovery.connectToDiscoveredPrinter(context, printerSelected, listener);
}
else {
    printerDetails.reconnect()
}
Scenario #3: You call printerDetails.disconnect() to forget the connected printer. This forgets the printer internally. Therefore, reconnect() will not work until you connect with connectToDiscoveredPrinter and are successful again. Calling printerDetails.disconnect() also releases ownership (if you are using an M211) so the blue blinking light is a clear indication that you are disconnected. However if you call printerDetails.disconnectWithoutForget(), the previously connected printer will be remembered still. Therefore, this is a perfect situation to use reconnect().
Opening Templates
Before adding code, create a subdirectory called "raw" within your app's default res directory to place template files (.BWT).
Initializing a Template Object
1. Create a dropdown menu on the UI to allow users to select a template.
2. Populate the dropdown menu with the available file names.
3. When the user selects a template from the dropdown menu, open the resource as an InputStream
4. Call the SDKs "TemplateFactory.getTemplate(InputStream iStream, Context MainActivity.this)" method to retrieve the Template object
After successfully initializing the Template object, iterate through its placeholders to set any desired values. (Example: An EditText view to allow the user of the application to set the value of a specific field in the template.)
private void initializeDropdownMenu(){
        //Iterates through template files in the "raw" subdirectory to create a list of the file names.
        for(Field field : R.raw.class.getFields()) {
            TypedValue value = new TypedValue();
            int id = getResources().getIdentifier(field.getName(), "raw", getPackageName());
            context.getResources().getValue(id, value, true);
            String[] nameSplit = value.string.toString().split("/");
            fileList.add(templateName);
        }
        ArrayAdapter<String> adapter = new ArrayAdapter<>(this, android.R.layout.simple_list_item_1, fileList);
        adapter.setDropDownViewResource(android.R.layout.simple_spinner_dropdown_item);
        templatesSpinner.setAdapter(adapter);

        //Triggers when a user selects an item in the drop down menu.
        templatesSpinner.setOnItemSelectedListener(new AdapterView.OnItemSelectedListener(){
            @Override
            public void onItemSelected(AdapterView<?> adapterView, View view, int i, long l) {
                //The name of the selected template file we want to open.
                String selectedFileName = templatesSpinner.getSelectedItem().toString();
                //Initialize an input stream by opening the file that matches this name.
                InputStream iStream = getResources().openRawResource(getResources().getIdentifier(selectedFileName.split("[.]")[0], "raw", getPackageName()));
                //Call the SDK method ".getTemplate()" to retrieve its Template Object
                template = TemplateFactory.getTemplate(iStream, MainActivity.this);

                //Simple way to iterate through any placeholders to set desired values.
                for(TemplateObjectData placeholder : template.getTemplateData()){
                    messageEditText.setText(placeholder.getValue());
                }
            }

            @Override
            public void onNothingSelected(AdapterView<?> adapterView) {

            }
        });
    }
Setting a Placeholder Value
After a successful initialization of a "Template" object, use the getTemplateData() method to set a specific value to a placeholder on the template. This example shows how to iterate through all template data until we find the placeholder named "ExamplePlaceholder" and changes it to say "Example."
for (TemplateObjectData placeholder : template.getTemplateData()) {
    if (placeholder.getName() == "ExamplePlaceholder") {
        placeholder.setValue("Example");
    }
}
If you would like to display to your user what type of object the current placeholder is, use the following code to retrieve a TemplateObjectType. This enumeration represents the type of object/placeholder. This is useful if a template placeholder was renamed in BWS that doesn't represent the type of object very well. For example a barcode in BWS could be renamed to "ExamplePlaceholder" in BWS. Your user would have no idea that this object is a barcode without TemplateObjectData.getTemplateObjectType().
for (TemplateObjectData placeholder : template.getTemplateData()) {
    if (placeholder.getName() == "ExamplePlaceholder") {
        //This can return the values StaticText, Text, Rectangle, Barcode, Image, PolyPolyLine, or Other
        TemplateObjectType placeholderType = placeholder.getTemplateObjectType();
    }
}
Previewing the Template
- Call template.getPreview(labelNumber, dpi, maxPixelWidthAndHeight) where:
- labelNumber represents the 0-based index of the label (0 unless using a multi label template).
- dpi represents the amount of dots per inch in the preview image (usually 96).
- maxPixelWidthAndHeight represents the size of the ImageView on your UI.
public void previewTemplate(View view) {
    //"preview" is the ImageView object in our Activity.
    double elementSize = Math.min(preview.getWidth(), preview.getHeight());
    bitPreview = template.getPreview(0, 96, elementSize);
    preview.setImageBitmap(bitPreview);
}
Printing
-
To print, call
printerDetails.print(context, template, printingOptions, dontPrintTrailerFlag)contextis the UI Context object.templateis the Template object (reference the Open Templates page).printingOptionsis the PrintOptions object we initialize (reference below).dontPrintTrailerFlagis a Boolean that represents if we want a trailer on our label.
-
The SDKs PrintingOptions is used to set CutOptions and the number of copies to print.
PrintingOptions printingOptions = new PrintingOptions();
    printingOptions.setCutOption(CutOption.EndOfJob);
    printingOptions.setNumberOfCopies(1);
-
Similar to connecting, it is recommended to call the .print() method inside another thread.
- A progress bar can be used similar to when we connected to the printer.
- All together, a UI's print function may look like:
public void printTemplate(Template template) {
    PrintingOptions printingOptions = new PrintingOptions();
    printingOptions.setCutOption(CutOption.EndOfJob);
    printingOptions.setNumberOfCopies(1);
    printingOptions.setIsCollated(true);
    Runnable r = () -> {
        runOnUiThread(()->progressBar.setVisibility(View.VISIBLE));
        printerDetails.print(context, template, printingOptions, null);
        runOnUiThread(()->progressBar.setVisibility(View.INVISIBLE));
    };
    Thread printThread = new Thread(r);
    printThread.start();
}
- Alternatively, if the desire is to simply print an image instead of a Brady Workstation template, you may use the print method shown below.
public void print(Bitmap bitmap) {
        PrintingOptions printingOptions = new PrintingOptions();
        printingOptions.setCutOption(CutOption.EndOfJob);
        printingOptions.setNumberOfCopies(1);
        Runnable r = () -> {
            runOnUiThread(()->progressBar.setVisibility(View.VISIBLE));
            printerDetails.print(context, bitmap, printingOptions, false);
            runOnUiThread(()->progressBar.setVisibility(View.INVISIBLE));
        };
        Thread printThread = new Thread(r);
        printThread.start();
    }
- Use extensions such as PNGs, JPGs, JPEGs, WEBPs, or SVGs can be converted into a Bitmap. For example, "selectedFileName" was a file named "bradylogo.png" that the user selected:
String selectedFileName = templatesSpinner.getSelectedItem().toString();
InputStream iStream = getResources().openRawResource(getResources().getIdentifier(selectedFileName.split("[.]")[0], "raw", getPackageName()));
bitmap = BitmapFactory.decodeStream(iStream);