The Brady iOS Print SDK
XCode Prerequisites
Software Requirements
To use the Brady SDK, you must have at least:
- iOS 15 or higher
- Swift 5
Add the SDK to your XCode Project
To use the iOS SDK Framework, follow the steps below.
- Download the iOS SDK from bradyid.com.
- Create a new Xcode Application
-
After unzipping the "BradySdk-iOS.zip", drag and drop the ".xcframework" file to the root of your app in the file tree.
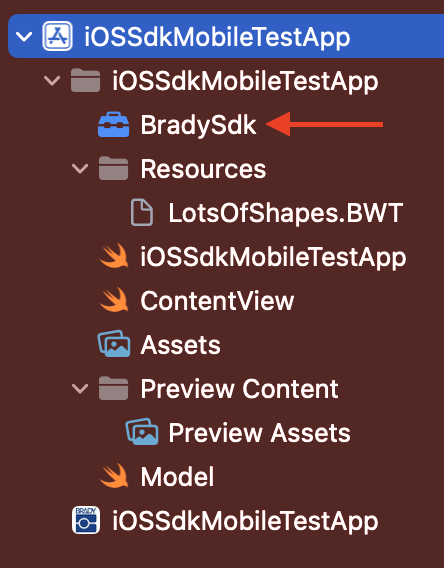
-
Xcode will now show the framework under the "Frameworks, Libraries, and Embedded Content" section in the App Target.
-
Change the Embedded field to "Embed & Sign."
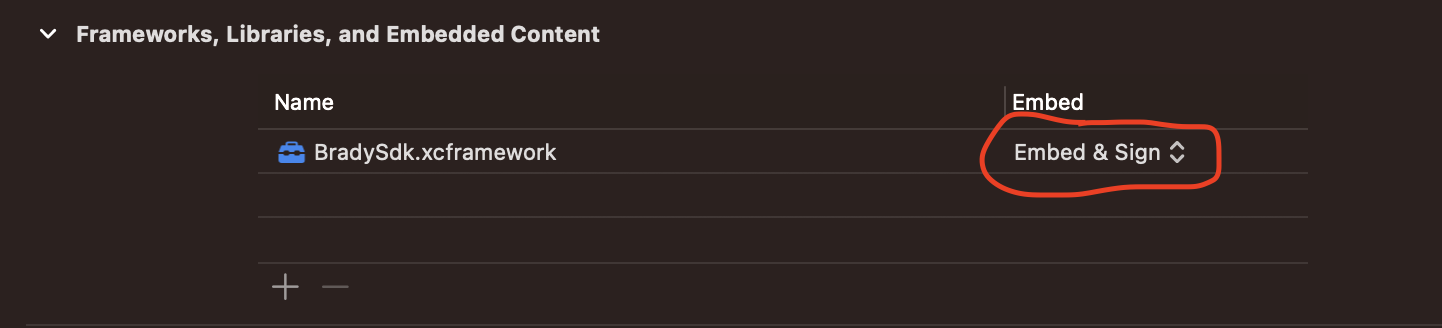
-
Test that everything is added correctly by typing "import BradySdk" at the top of any file in your app (it will autofill the name if it can find the framework).
Adding Permissions
In order to use Bluetooth and Wi-Fi discovery and connection within the SDK, you must let the user allow these permissions the first time the application is opened. This pop-up will appear automatically when these permissions are added to the "info.plist" in your app.
-
Under the "Info" tab off your app settings, add the following permissions underneath "Custom Target Properties."
- Privacy - Bluetooth Always Usage Description
- Privacy - Bluetooth Peripheral Usage Description
- Privacy - Local Network Usage Description
- Bonjour services:
- Enter the value "_pdl-datastream._tcp." for the Key "Item 0".
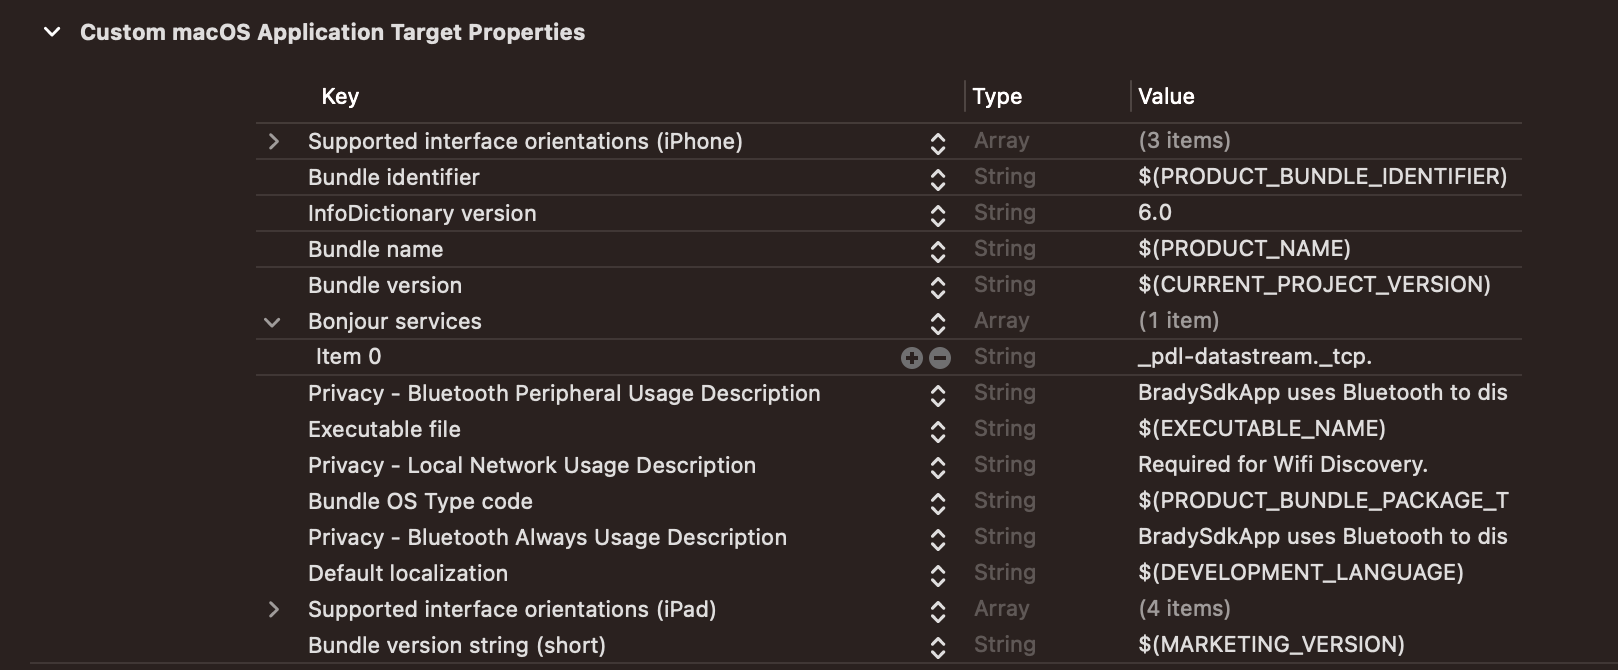
- You may enter whatever message you would like under the value column for these permissions (excluding Bonjour Services).
- To verify this worked, run your application and you will see a "pop up" window asking you to allow the permissions.
- If a user cancels the pop up and selects "Don't Allow", they can always allow these permissions in their device's "Settings" application.
Versions >=1.7.0
Custom Brady fonts are no longer embedded in the iOS SDK. Therefore, they must be downloaded here.
The custom Brady fonts only need to be downloaded and embedded into your application if the BWT files being used by your application were designed with any of these fonts. To embed them in your iOS application:
- Create a folder named "fonts" in your application's "Resource" directory.
- Add the desired fonts to this new folder.
- Drag and drop each font to the "Copy Bundle Resources" section to add the fonts to the main bundle of your application.
- In XCode click your application's .xcodeproj file >> Build Phases Tab >> Expand the Copy Bundle Resources dropdown >> this is where you drag and drop the fonts.
Printer Discovery
Before starting this tutorial, it is important to note that the SDK was not designed to discover, connect, print, and disconnect all at once. The printer itself will still struggle to receive and send data this quickly.
Example: It is not recommended to design an app with a single button labeled "Print" where the app would discover, connect, print, and then disconnect on the button click.
Requesting Permissions
In order to discover nearby printers, the user must approve the required permissions:
(Reference the Setup page for the iOS SDK)
- This should prompt the user only on the initial opening of the application.
- If the user does not allow permissions when prompted, they can always go into the settings app to allow them later. However, the user will never be able to discover printers without approving these permissions.
Implementing Discovery
- Create a new PrinterDiscovery object by initializing a listeners array and passing it to the factory:
var listeners = [PrinterDiscoveryListener]()
listeners.append(self)  // Implement PrinterDiscoveryListener in your class
var printerDiscovery: PrinterDiscovery = PrinterDiscoveryFactory.getPrinterDiscovery(listeners: listeners)
- Implement the PrinterDiscoveryListener protocol in your model class:
- This requires you to implement the printerDiscovered and printerRemoved methods:
public func printerDiscovered(discoveredPrinterInformation: DiscoveredPrinterInformation) {
    if(!foundPrinters.contains(where: {discoveredPrinterInformation.getName() == $0.getName() && discoveredPrinterInformation.getConnectionType().rawValue == $0.getConnectionType().rawValue})) {
        foundPrinters.append(discoveredPrinterInformation)
    }
}

public func printerRemoved(discoveredPrinterInformation: DiscoveredPrinterInformation) {
    DispatchQueue.main.async {
        foundPrinters.removeAll(where: {
            $0.getName() == discoveredPrinterInformation.getName() && $0.getConnectionType() == discoveredPrinterInformation.getConnectionType()
        })
    }
}
- Start discovering nearby printers by calling both BLE and Wi-Fi discovery methods:
printerDiscovery.startBlePrinterDiscovery() //or 'startBluetoothPrinterDiscovery()' instead if your printer is a Bluetooth Classic device
printerDiscovery.startWifiPrinterDiscovery()
- To stop the discovery scan, call:
printerDiscovery.stopPrinterDiscovery()
- To find the most recent printer you successfully connected to, call:
let lastConnectedPrinter = printerDiscovery.getLastConnectedPrinterName()
Displaying Printers
Swift's @Published and @ObservedObject property wrappers enable automatic UI updates when data changes.
In your model class, mark the printers list as published:
@Published private var foundPrinters = [DiscoveredPrinterInformation]()
Your model class should conform to both PrinterUpdateListener and PrinterDiscoveryListener, and inherit from ObservableObject:
public class Model: PrinterUpdateListener, PrinterDiscoveryListener, ObservableObject {
    @Published private var foundPrinters = [DiscoveredPrinterInformation]()
    // ... other properties
}
In your SwiftUI view, observe the model:
struct ContentView: View {
    @ObservedObject var model: Model
    // ... rest of view
}
Now you can display the printers in a list, and the UI will automatically update whenever printers are discovered or removed:
List(model.getFoundPrinterNames(), id: \.self) { printerName in
    Text(printerName)
}
Printer Connection
Connecting to a Printer
The connectToDiscoveredPrinter method uses the initialized PrinterDiscovery object to connect to a printer and returns a PrinterDetails object.
var listeners: Array<PrinterUpdateListener> = []
listeners.append(self)

// Iterate through all found printers
var printerToConnectTo: DiscoveredPrinterInformation? = nil
for printer in foundPrinters {
    if printer.getName() == printerSelected {
        printerToConnectTo = printer
        printerDiscovery.stopPrinterDiscovery()
    }
}

// Connect to the found printer
do {
    if printerDetails == nil {
        printerDetails = try await printerDiscovery.connectToDiscoveredPrinter(printerSelected: printerToConnectTo, listeners: listeners)
    }
} catch let error {
    debugPrint(error)
    return false
}
Key points:
- The printerSelected parameter is the DiscoveredPrinterInformation object representing the printer to connect to.
- The listeners parameter is an array of PrinterUpdateListener objects. The model class should implement this protocol to receive printer status updates.
- After successful connection, you'll receive a PrinterDetails object with printer information (name, model, battery level, supply information, etc.).
- If connection fails, it will return nil.
- The printerDetails.haveOwnership() method can be used to check if the device owns the printer (relevant for M211 models).
Automatic Connection
Once your application has connected to a printer for the first time, it will store the printer object internally. In the future, you can add a feature to your app that grabs this object and connects to it automatically without the user manually selecting a printer from the UI:
//Use this PrinterDiscovery method to find the name of the printer available to automatically connect to.
lastConnectedPrinterName = printerDiscovery.getLastConnectedPrinterName()
//Now, whenever a printer is discovered, it'll compare it immediately to this printer name.
//If it matches, it'll attempt to connect right away when the app starts.
if newlyDiscoveredPrinter == model.lastConnectedPrinterName {
    connected = try await model.connectToDiscoveredPrinter(printerSelected: printerToConnectTo!, listeners: listeners)
}
Calling printerDetails.disconnect() will make the app "forget" the current printer internally and will not connect to it automatically afterwards. Alternatively, calling printerDetails.disconnectWithoutForget() will disconnect from the printer temporarily, but getLastConnectedPrinterName() will still return the name of the printer you just disconnected from.
OWNERSHIP NOTE: Using an M211 introduces the concept of "ownership". When connecting to an M211 with a mobile device for the first time, the blue light on the M211 should be blinking. If the light is solid blue, another mobile device "owns" the printer and only that device will be able to connect. In the event that a connection fails, a device can still have "ownership". Therefore, being connected and having ownership are not synonymous. To connect using a different mobile device, hold the power button for five seconds to release ownership.
Disconnecting from Printers
public func disconnect() async {
    do {
        let detailsToDisconnect = printerDetails
        printerDiscovery.forgetLastConnectedPrinter()

        let result = try await detailsToDisconnect?.disconnect() ?? false

        await MainActor.run {
            self.isDisconnected = true
            self.lastConnectedPrinterName = nil
            self.printerDetails = nil
        }

        if result {
            print("Disconnect Successful!")
        } else {
            print("Disconnect Failed!")
        }
    }
    catch let error {
        debugPrint(error)
    }
}
After disconnecting, you can call printerDiscoveryStarted() to begin discovering printers again.
Performing Printer Operations
Basic Operations (M211 & M511)
Cut a label:
public func cutLabel() async {
    do {
        let result = try await printerDetails?.cutSupply() ?? false
        if result {
            print("Operation Successful!")
        } else {
            print("Operation Failed!")
        }
    }
    catch let error {
        debugPrint(error)
    }
}
Feed a label:
public func feed() async {
    do {
        let result = try await printerDetails?.feedSupply() ?? false
        if result {
            print("Operation Successful!")
        } else {
            print("Operation Failed!")
        }
    }
    catch let error {
        debugPrint(error)
    }
}
Set automatic shutdown timer:
public func setAutomaticShutdown(minutes: Int) async {
    do {
        let result = try await printerDetails?.setAutomaticShutdownTime(timeInMinutes: minutes) ?? false
        if result {
            print("Automatic Shutdown Timer Set Successfully!")
        } else {
            print("Failed to Set Automatic Shutdown Timer!")
        }
    }
    catch let error {
        debugPrint(error)
    }
}
Inkjet Printer Operations
Clean Printhead:
public func cleanPrinthead() async {
    do {
        let result = try await printerDetails?.cleanPrinthead() ?? false
        if result {
            print("Clean Printhead Successful!")
        } else {
            print("Clean Printhead Failed!")
        }
    } catch {
        debugPrint(error)
    }
}
Reset Maintenance Station:
public func setMaintenanceStationReset() async {
    do {
        let result = try await printerDetails?.setMaintenanceStationProperty(station: .Reset) ?? false
        if result {
            print("Maintenance Reset Successful!")
        }
    } catch {
        debugPrint(error)
    }
}
Print Alignment Label:
public func printAlignmentLabel() async {
    do {
        let result = try await printerDetails?.printAlignmentLabel() ?? false
        if result {
            print("Print Alignment Label Successful!")
        }
    } catch {
        debugPrint(error)
    }
}
Set Alignment Offset:
public func setAlignmentOffset(offset: Int) async {
    do {
        let result = try await printerDetails?.setAlignmentOffset(offsetValue: offset) ?? false
        if result {
            print("Set Alignment Offset Successful!")
        }
    } catch {
        debugPrint(error)
    }
}
Set Quality Mode:
public func setPrinterQualityMode(mode: PrintMode) {
    do {
        try printerDetails?.setPrinterQualityMode(qualityMode: mode)
        print("Set Quality Mode to \(mode)")
    } catch {
        debugPrint(error)
    }
}
Monitoring Printer Status Changes
Implement the PrinterUpdateListener protocol to receive real-time printer status updates:
public func PrinterUpdate(changedProperties: Array<PrinterProperties>) {
    DispatchQueue.main.async {
        for property in changedProperties {
            switch property {
            case PrinterProperties.CurrentStatus:
                let updateMessage = self.printerDetails?.getPrinterStatusMessage()
                switch updateMessage {
                case "PrinterStatus_Disconnected":
                    self.toastMessage = "Disconnected"
                    self.isDisconnected = true
                case "PrinterStatus_Connecting":
                    self.toastMessage = "Connected"
                case "PrinterStatus_Initialized":
                    self.toastMessage = "Connected"
                case "PrinterStatus_HeadOpen_ErrorBody":
                    self.toastMessage = "Head Open Error"
                default:
                    self.toastMessage = updateMessage ?? "Ready"
                }
            case PrinterProperties.SupplyName:
                self.supplyName = self.printerDetails?.getSupplyName() ?? ""
            case PrinterProperties.SupplyWidth, PrinterProperties.SupplyHeight:
                self.supplyDimensions = self.printerDetails?.getSupplyDimensions() ?? ""
            case PrinterProperties.SupplyRemainingPercent:
                self.supplyRemaining = String(self.printerDetails?.getSupplyRemainingPercentage() ?? 0)
            case PrinterProperties.BatteryChargePercentage:
                self.batteryLevel = String(self.printerDetails?.getBatteryLevelPercentage() ?? 0) + "%"
            default:
                break
            }
        }
    }
}
Always dispatch UI updates on the main thread using DispatchQueue.main.async to avoid data races.
Connect/Disconnect Scenarios
Scenario #1 — Unexpected Disconnect:
If a connected printer unexpectedly disconnects (power off, out of range), the SDK sends a PrinterStatus_Disconnected update. Listen for this in your PrinterUpdate() implementation and update the UI accordingly:
case PrinterProperties.CurrentStatus:
    let updateMessage = self.printerDetails?.getPrinterStatusMessage()
    if updateMessage == "PrinterStatus_Disconnected" {
        self.toastMessage = "Disconnected"
        self.isDisconnected = true
        // Update UI to disable print button, show reconnection options, etc.
    }
Scenario #2 — First-Time Connection:
When connecting for the first time, check if printerDetails is nil before attempting connection:
if printerDetails == nil {
    printerDetails = try await printerDiscovery.connectToDiscoveredPrinter(printerSelected: printerToConnectTo, listeners: listeners)
}
If the app closes and reopens, printerDetails will be nil again, requiring a fresh connection via discovery.
Scenario #3 — M211 Ownership:
When connecting to an M211, the device must "own" the printer to communicate with it. A solid blue light indicates another device owns the printer; a blinking blue light means the printer is ready to be owned. To release ownership, hold the power button for 5 seconds. Check ownership after connection with:
let hasOwnership = printerDiscovery.getHaveOwnership()
Open Templates
Before adding code, create a subdirectory within your app's root directory to place template files (.BWT).
Initialize a Template Object
Create a dropdown menu in SwiftUI to allow users to select a template:
Menu {
    Picker("Template Picker", selection: $selection) {
        if model.printerDetails != nil {
            ForEach(model.getTemplatesForPrinter(), id: \.self) {
                Text($0).font(.footnote)
            }
        }
    }.onChange(of: selection) {
        // Update preview when selection changes
        self.image = templatePreview(selection: selection)
    }
} label: {Text(selection).font(.caption).padding()}
In your model, implement the getSelectedTemplate() method to load template files:
public func getSelectedTemplate(context: AppContext, selection: String) -> Template? {
    do {
        self.selection = selection
        let filePath = URL(fileReferenceLiteralResourceName: selection)
        let templateData: Data = try Data(contentsOf: filePath)

        // Encode to base64 for proper handling
        let base64: String = templateData.base64EncodedString()
        guard let base64Data = base64.data(using: .utf8) else {
            print("Could not get the desired Template object.")
            return nil
        }

        guard let templateData2 = Data(base64Encoded: base64Data) else {
            print("Could not get the desired Template object.")
            return nil
        }

        let iStream: InputStream = InputStream(data: templateData2)
        return TemplateFactory.getTemplate(template: iStream)
    }
    catch let error {
        print(error)
    }
    return nil
}
Note: Template files (.BWT) must be in a subdirectory at your project's root for fileReferenceLiteralResourceName to find them.
Setting Placeholder Values
After loading a template, use the getTemplateData() method to access and modify placeholder values. The approach depends on the template type:
For Text Templates:
public func setPrintPreview(template: Template?, firstValue: String, secondValue: String?) -> UIImage? {
    if template != nil {
        do {
            if selection.contains("Text") {
                for entity in try template!.getTemplateData() {
                    if entity.getName() == "TEXT 1" {
                        try entity.setValue(value: firstValue)
                    }
                    else if entity.getName() == "TEXT 2" {
                        try entity.setValue(value: secondValue ?? "")
                    }
                }
            }
        } catch {
            // Handle error
        }
    }
    return nil
}
For Barcode Templates:
if selection.contains("Barcode") {
    for entity in try template!.getTemplateData() {
        if entity.getName() == "BARCODE 1" && firstValue.count > 2 {
            try entity.setValue(value: firstValue)
        }
    }
}
To determine the type of a placeholder, use getTemplateObjectType(), which returns values like StaticText, Text, Rectangle, Barcode, Image, PolyPolyLine, or Other.
Preview the Template
Call template.getPreview() to generate a preview image of the template. Pass the printerDetails parameter to ensure the preview accounts for printer-specific properties like ribbon and supply colors:
func setPrintPreview(template: Template?, firstValue: String, secondValue: String?) -> UIImage? {
    if template != nil {
        do {
            // Set placeholder values (see Setting Placeholder Values section)
            let cgImage = try template?.getPreview(
                labelNumber: 0,
                dpi: 96,
                maxPixelWidthAndHeight: 200,
                printerDetails: self.printerDetails
            )
            self.template = template!
            if cgImage == nil {
                self.printPreview = UIImage()
            }
            else {
                self.printPreview = UIImage(cgImage: cgImage!)
            }
        }
        catch {
            // Handle error
        }
        return self.printPreview
    }
    return nil
}
Use this in SwiftUI to display the preview:
Image(uiImage: model.getPrintPreview())
    .resizable()
    .scaledToFit()
    .frame(maxWidth: UIScreen.main.bounds.size.width * 0.8, maxHeight: UIScreen.main.bounds.size.height * 0.25)
Printing
Printing Templates
To print a template, ensure the printer is connected and the template has been loaded with placeholder values set:
public func printTemplate() async {
    // Guard: must be connected before printing.
    guard let printerDetails = printerDetails else {
        await MainActor.run { self.toastMessage = "Not connected to a printer." }
        return
    }
    // Guard: template must be loaded via setPrintPreview() before printing.
    guard let template = template else {
        await MainActor.run { self.toastMessage = "No template selected." }
        return
    }

    let options = PrintingOptions()
    options.cutOption = CutOption.EndOfJob
    options.numberOfCopies = 1
    options.isCollated = true
    let dontPrintTrailerFlag = selection.contains("Cable-Wrap")

    do {
        let status = try await printerDetails.print(
            template: template,
            printingOptions: options,
            dontPrintTrailerFlag: dontPrintTrailerFlag
        )
        debugPrint("Printing Result: \(status)")
    } catch {
        debugPrint(error)
        await MainActor.run { self.toastMessage = "Printing failed: \(error.localizedDescription)" }
    }
}
Printing Images
To print an image (PNG, JPG, JPEG, WEBP, or SVG) or PDF:
public func printImage(selection: String) async {
    guard let printerDetails = printerDetails else {
        await MainActor.run { self.toastMessage = "Not connected to a printer." }
        return
    }

    let printingOptions = PrintingOptions()
    printingOptions.cutOption = CutOption.EndOfJob
    printingOptions.numberOfCopies = 1
    printingOptions.isCollated = true

    do {
        let components = selection.split(separator: ".")
        guard let name = components.first else {
            print("Error: Invalid file name format.")
            return
        }

        let ext = components.count > 1 ? String(components.last!) : "pdf"
        if ext == "pdf" {
            guard let pdfURL = Bundle.main.url(forResource: String(name), withExtension: ext) else {
                print("Error: Could not find PDF named: \(selection)")
                return
            }
            let data = try Data(contentsOf: pdfURL)
            let status = try await printerDetails.printPDF(
                fileData: data,
                rotationDegrees: 0,
                printingOptions: printingOptions,
                dontPrintTrailerFlag: false
            )
            debugPrint("Printing Result: \(status)")
        } else {
            guard let image = UIImage(named: selection) else {
                print("Error: Could not load image.")
                return
            }
            let status = try await printerDetails.print(
                images: [image],
                printingOptions: printingOptions,
                dontPrintTrailerFlag: false
            )
            debugPrint("Printing Result: \(status)")
        }
    } catch {
        debugPrint(error)
        await MainActor.run { self.toastMessage = "Printing failed: \(error.localizedDescription)" }
    }
}
Printing with RFID Encoding (i7500)
For RFID-enabled printers like the i7500, you can encode data onto RFID tags during printing:
public func printTemplateWithRfid() async {
    guard let printerDetails = printerDetails else {
        await MainActor.run { self.toastMessage = "Not connected to a printer." }
        return
    }
    guard let template = template else {
        await MainActor.run { self.toastMessage = "No template selected." }
        return
    }

    let options = PrintingOptions()
    options.cutOption = CutOption.EndOfJob
    options.numberOfCopies = 3  // Print 3 labels with different RFID data
    options.isCollated = true

    // Define RFID operations for each label
    let rfidOperations: [[RfidOperation]] = [
        // Label 1 RFID data
        [
            try RfidOperation(
                command: RfidCommandType.Write,
                inputType: RfidInputType.ASCII,
                location: RfidLocation.ElectronicProductCode,
                data: "1AAAAAAAAAA",
                password: nil,
                offset: 0,
                numberOfBlocks: nil
            ),
            try RfidOperation(
                command: RfidCommandType.Write,
                inputType: RfidInputType.HEX,
                location: RfidLocation.User,
                data: "AAAAAAAAAA",
                password: nil,
                offset: 0,
                numberOfBlocks: nil
            )
        ],
        // Label 2 RFID data
        [
            try RfidOperation(
                command: RfidCommandType.Write,
                inputType: RfidInputType.ASCII,
                location: RfidLocation.ElectronicProductCode,
                data: "2BBBBBBBBBB",
                password: nil,
                offset: 0,
                numberOfBlocks: nil
            ),
            try RfidOperation(
                command: RfidCommandType.Write,
                inputType: RfidInputType.HEX,
                location: RfidLocation.User,
                data: "BBBBBBBBBB",
                password: nil,
                offset: 0,
                numberOfBlocks: nil
            )
        ],
        // Label 3 RFID data
        [
            try RfidOperation(
                command: RfidCommandType.Write,
                inputType: RfidInputType.ASCII,
                location: RfidLocation.ElectronicProductCode,
                data: "3CCCCCCCCCC",
                password: nil,
                offset: 0,
                numberOfBlocks: nil
            ),
            try RfidOperation(
                command: RfidCommandType.Write,
                inputType: RfidInputType.HEX,
                location: RfidLocation.User,
                data: "CCCCCCCCCC",
                password: nil,
                offset: 0,
                numberOfBlocks: nil
            )
        ]
    ]

    do {
        let status = try await printerDetails.print(
            template: template,
            rfidOperations: rfidOperations,
            printingOptions: options,
            dontPrintTrailerFlag: false
        )
        debugPrint("RFID Printing Result: \(status)")
    } catch {
        debugPrint(error)
        await MainActor.run { self.toastMessage = "RFID printing failed: \(error.localizedDescription)" }
    }
}
RFID Parameters:
- rfidOperations: A 2D array where each inner array represents operations for one label. Each
RfidOperationspecifies: - command:
RfidCommandType.Write(or other supported commands) - inputType:
RfidInputType.ASCIIorRfidInputType.HEX - location:
RfidLocation.ElectronicProductCodeorRfidLocation.User(memory location on the tag) - data: The data to encode (ASCII or HEX string)
- password: Optional password for tag security (nil if not needed)
- offset: Starting offset in memory (typically 0)
- numberOfBlocks: Number of memory blocks (nil for default)